Dashboard
The Level State section in the dashboard provide a quick view of the trailer level state. The dashboard does not show how much the trailer is out of level, only that it is uncalibrated, level, or not level.
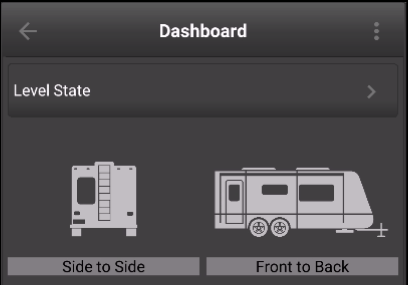
Uncalibrated Level State |
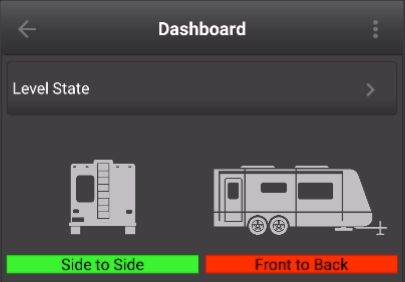
Calibrated Level State |
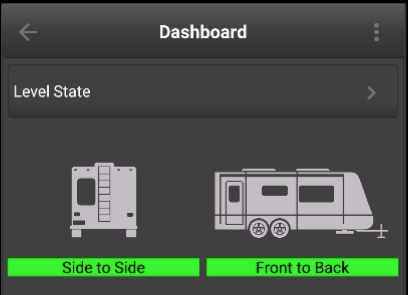
Calibrated Level State |
To get additional detail on the trailer level state tap on the right arrow in the Level State header.
Level State
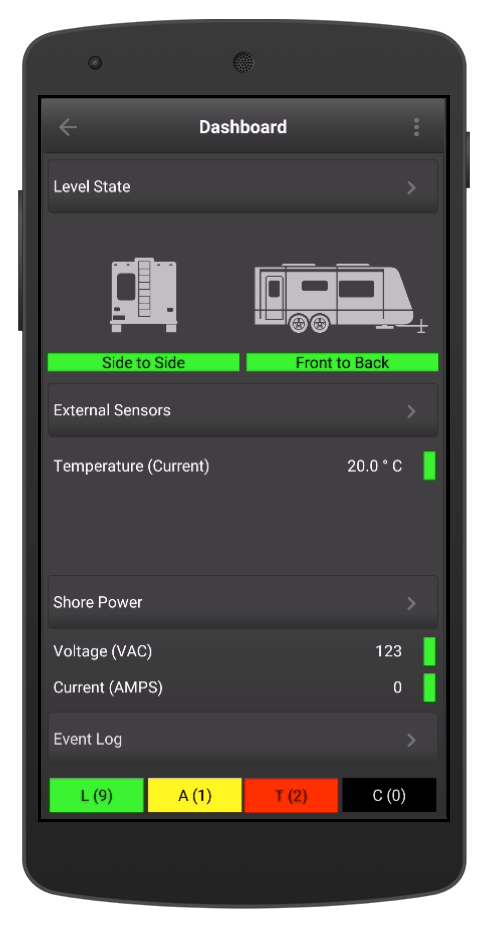
Once you selected the trailer to connect, the application launches the dashboard. Level Up displays a snapshot of all the sensors, such as trailer level state, internal sensors (Pro Only) , external sensors (Pro Only), EMS Status (Pro Only) and Events. The top of the dashboard contains a back arrow that disconnects your from your current trailer profile takes you back to the list of trailers. The three vertical dots on the top right will popup the main menu. You can tap on the popup menu any time you need access to general settings, trailer settings, ems settings etc.
Dashboard |
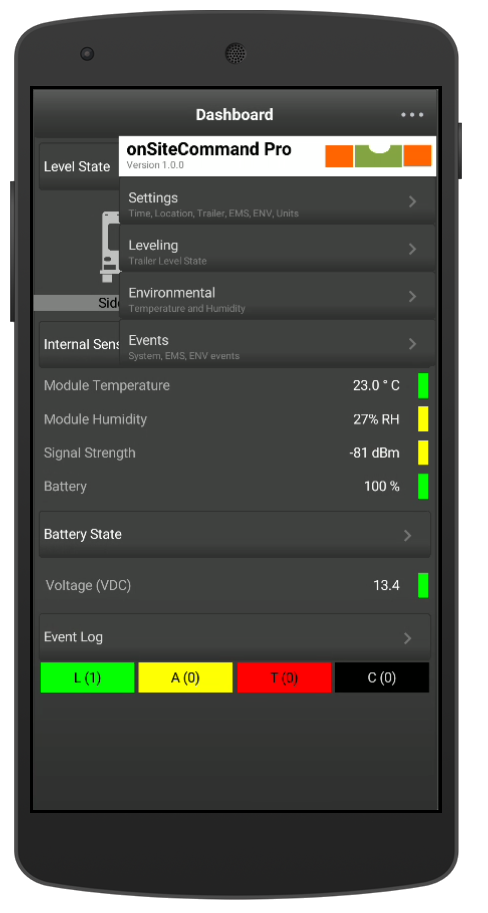
Popup Menu |
Internal Sensors
The Level Up Pro modules contain an internal temperature and humidity sensor, that can be used to monitor the environmental status of the compartment you installed the module in your RV. If you would like to monitor temperature and humidity inside the living area of your RV, we would recommend looking at purchasing some external sensors.
Sensor |
Range |
|---|---|
Temperature |
-40 to +125 C |
Humidity |
0 to 100 %RH |
Warning
The internal temperature and humidity sensor may not accurately reflect the actual temperature and/or humidity due to the module installation. For example if you install the Level Up Pro module in an enclosed space adjacent to the hot water heater or the furnance you will see results that are higher than ambient temperature and humidity.
Event Status
At the bottom of the dashboard is the event summary. Level Up classifies the events in to Log, Attention, Trouble and Critical. The dashboard includes the event counts for each of the event type.
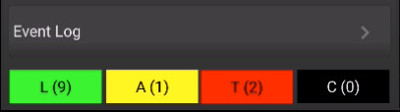
When clicking on the event type (green,yellow,red or black) button, Level Up will take you the event summary screen and automatically filter the events for the type you tapped on. For example if you tap on the Attention (yellow) you would taken to the events summary screen and be shown a single Attention Event. Choosing to tap on the arrow to the right of Event Log takes you to the event summary page will display all the events currently on the system.
EMS Summary
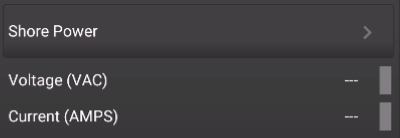
EMS - No Shore Power Detected |
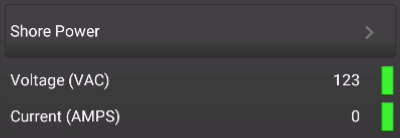
EMS - Shore Power Detected |
Voltage (AC)
Icon |
Description |
|---|---|

|
No Shore Power |

|
Voltage to Pedestal and the voltage is between 114 and 126 VAC |

|
Voltage is between 104 VAC and 114 VAC or voltage is between 126 VAC and 132 VAC |

|
Voltage to Pedestal but the voltage is lower than 104 VAC or greater than 132 VAC |
Note
In North America the standard is ± 5 % from the nominal 120 VAC. That puts the acceptable voltage range between 114 and 126 VAC. Progressive Industries considers anything from 104 VAC to 132 VAC acceptable. See Page 7 of the Progressive Industries manual for more information on voltage ranges).
Current (ACI)
Icon |
Load % |
EMS-HW30C (AMPS) |
EMS-HW50C (AMPS) |
|---|---|---|---|
|
|
0 |
— |
— |
|
|
0.1 - 50 |
Less than 15 AMPS |
Less than 25 AMPS |
|
|
50.1 - 75 |
Between 15.1 and 22 AMPS |
Between 25.1 and 36 AMPS |

|
75.1 - 90 |
Between 22.1 and 27 AMPS |
Between 36.1 and 45 AMPS |
|
|
90.1 - 100 |
Between 27.1 and 30 AMPS |
Between 45.1 and 50 AMPS |
Note
The color ranges for the load current are a function of the Level Up Pro application and not of the Progressive Industries EMS.
Levelling Screen
To access the levelling screen tap on Level State button on the dashboard. The screen shows a side to side view as well as a trailer profile view. In the side to side view the Level Up application is always referenced relative to the drivers side (left side) of the trailer. The front to back is always referenced off the back of the RV (i.e. the tongue is 1.5” inches higher than the back of the trailer).
The calibration banner will only appear on the level screen if the calibration process is underway. Once the calibration is complete the Level Up application will save the settings. The calibration banner will automatically disappear when complete.
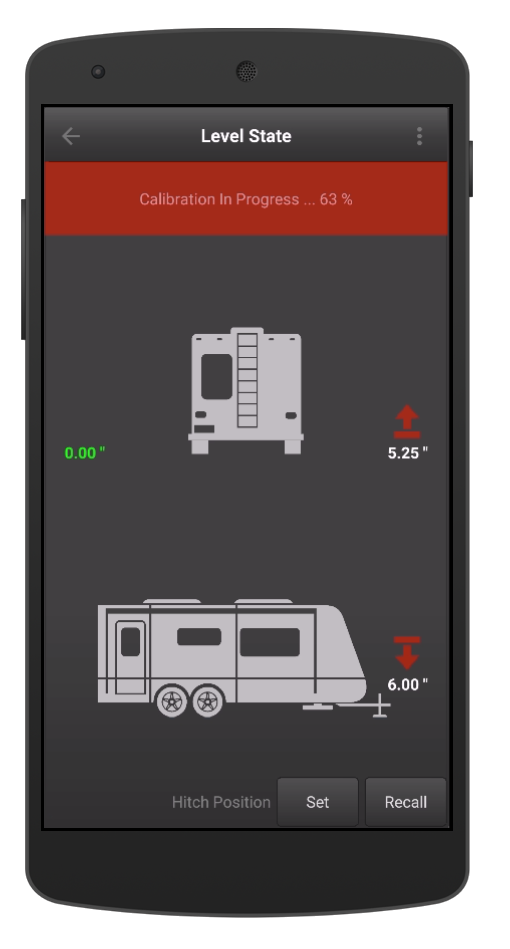
Level State - Calibration in Progress |

Level State - Normal Mode |
Icon |
Description |
|---|---|
|
The trailer is level within the measurement resolution setting. |

|
The trailer is high (front to back or side to side). |

|
The trailer is low (front to back or side to side) . |
Hitch Height Recall
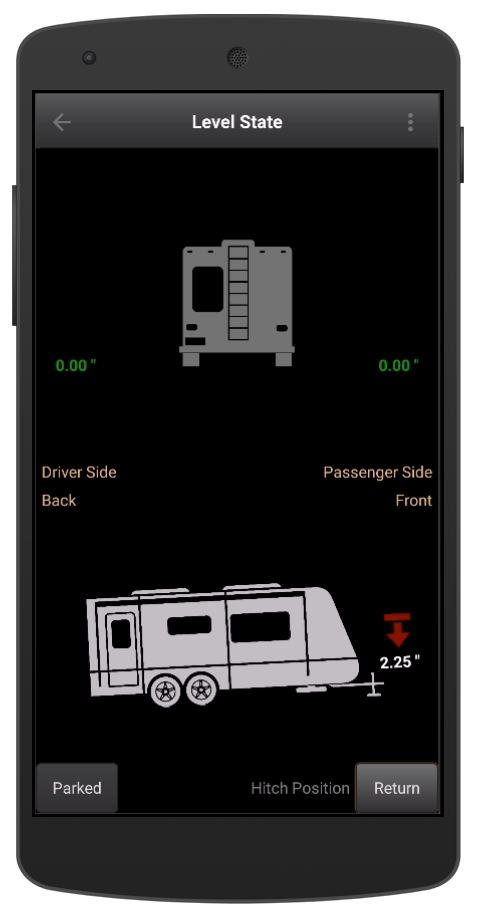
The hitch height recall allows you to save the hitch height when unhooking your RV. The saved hitch height is useful when rehooking the RV
Set
Unhook the RV and with the ball or fifth wheel pin high enough to clear the hitch press the Set button on the Level Screen.
Recall
When hooking the trailer to the tow vehicle, return to the level state screen and press the Recall button The background will change to black. The indicator at the front of the RV will change to show the how hight the RV hitch will need to be raised. When the icon goes green you know the hitch is high enough to clear the the ball and/or the pin.
Important
Never assume the trailer tongue/pin will clear without double checking.
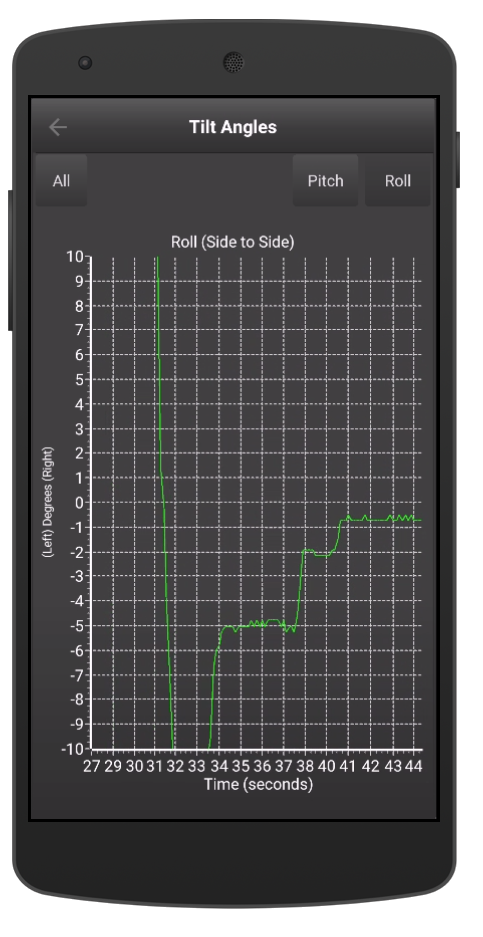
Trailer Tilt Charts
To view the roll and pitch of your trailer tap on either of the trailer icons in the Level State screen. The tilt graphs can be viewed together (by tapping all - not shown) or by tapping the Pitch or Roll button on the top right. The back arrow will take you back to the Level State screen.
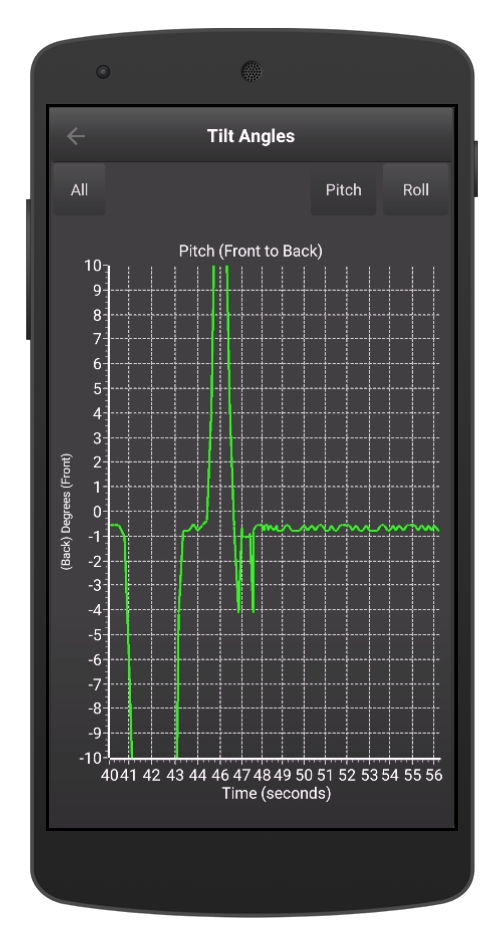
Tilt Angle - Pitch (Front to Back) |
Tilt Angle - Roll (Side to Side) |
The pitch and roll are displayed in degrees. If your trailer is level the lines on the graphs should be around the 0 degree mark (center of the graph).
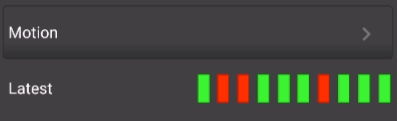
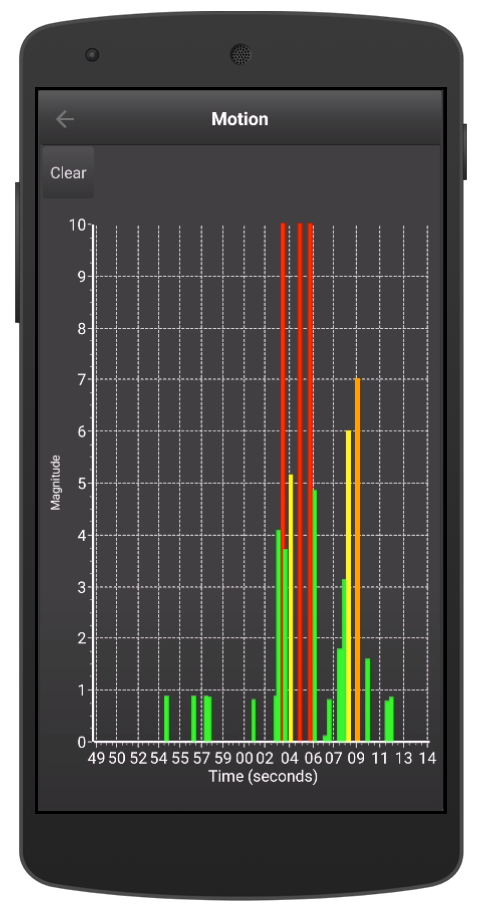
Motion
The motion section on the dashboard displays the latest movement of the trailer when the trailer is parked. In order for this section to appear in the dashboard your trailer must be marked at Parked (Level Screen), and you must have a oneView Pro module. The LED bar shows the last ten minutes of movement and the color is based on the severity of the movement. Each minute is represented by one bar. The bars are populated so the latest movement appears on the right.
Motion Detected - Red Indicates Motion |

No Motion Detected - Green Indicates no Motion |
For more detail on the motion and the severity tap on the right arrow in the motion section header. Tapping on the motion (in the dashboard) label (or arrow) displays the magnitude over time graph.
Movement Severity
Type |
Description |
|---|---|
|
|
The magnitude is less than 5 |
|
|
The magnitude is between 5 and 7 |
|
|
The magnitude is between 7 and 10 |
|
|
The magnitude is above 10 |
Settings Screen
General Trailer Settings
The General Trailer Settings allows you to customize your trailer name, as well as include the trailers license plate. The Master Events Control allows Level Up Pro modules to enable/disable events globally should they decide.
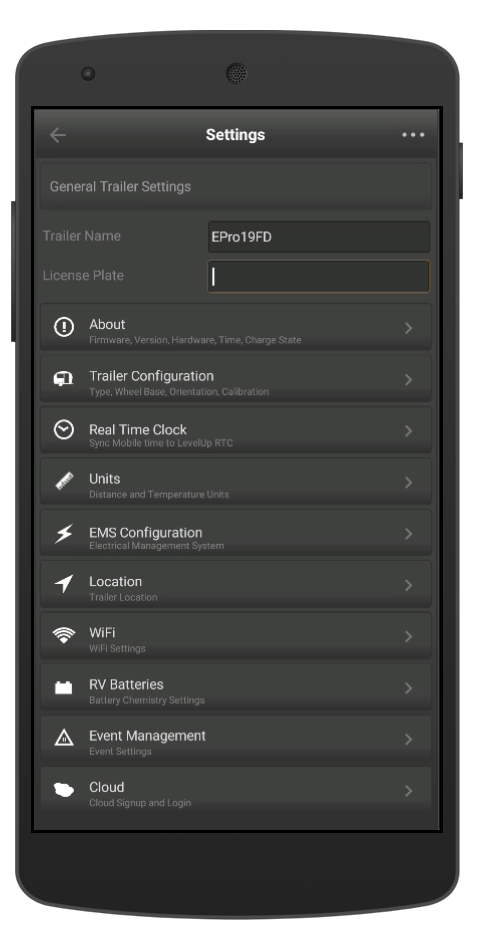
Trailer Name
The Level Up application allows you to assign a custom name to your RV. The default name is based on the Level Up module and the serial number (MAC address) of the device. For example if you are connected to the Pro module the name will be something like SIQ-LevelUp Pro-57b116 or if you are connected to the Lite version SIQ-LevelUp Lite-57b118.
License Plate
Use the trailer plate field to enter your RV license plate, or if you prefer enter the license plate of the tow vehicle. That way when you are registering at the campground or RV park you can use the Level Up application to view your license plate, and not run back into the parking lot to double check (ask me how I know). You don’t need to connect to actual module, the license plate will appear below the module name on the connect screen.
About
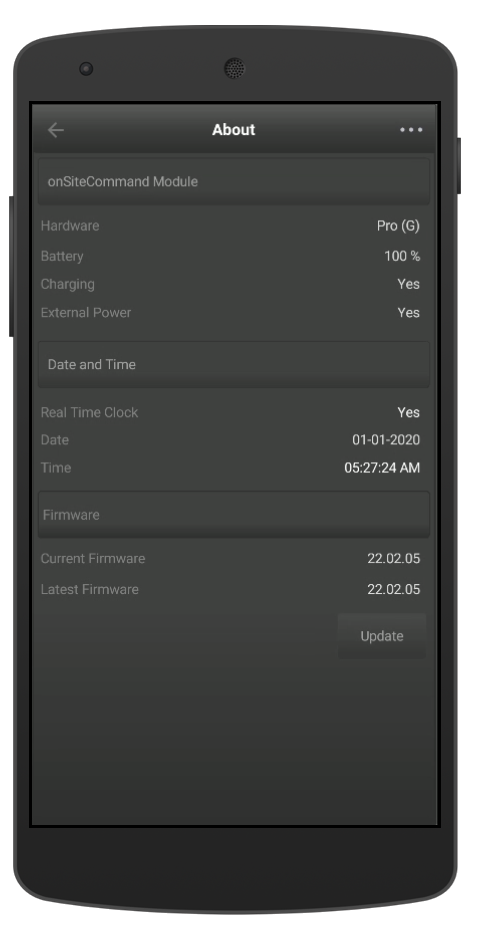
The about screen provides an overview of the Level Up module firmware and hardware. For more information on the hardware and firmware check out the Revisions section of the help for a list of all the changes, fixes and new feature.
Note
Upgrading the Level Up module requires the an active WiFi connection. The Update button will only be enabled if a newer version of the firmware was detected.
Trailer Configuration
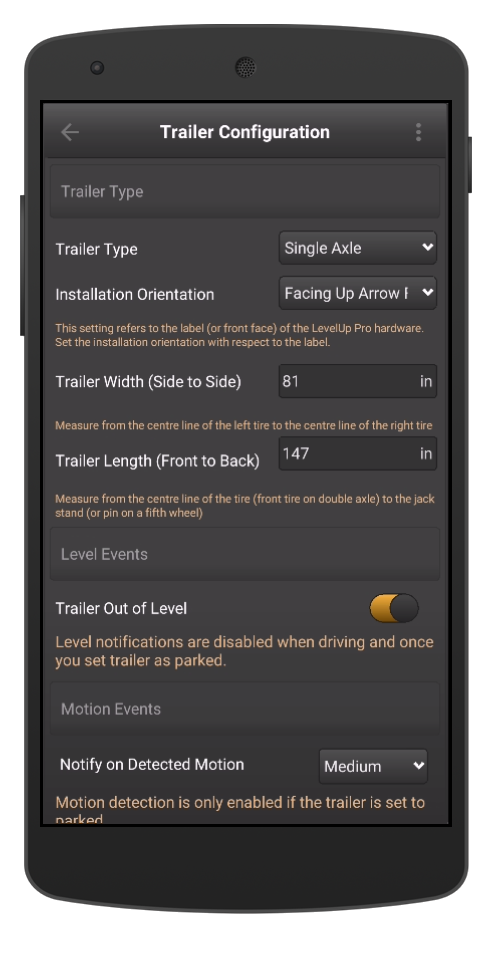
Trailer Type
Drop down allows you to customize the type of trailer you own. Options are Single Axle, Double Axle, Fifth Wheel, Class A, Class B, and Class C. The trailer type has no impact on the actual performance or calculation it simply selects the RV icon in the Level Screen and the dashboard.
Installation Orientation
Specifies how the Level Up module is installed in the RV. This parameter is critical to the calibration process. If you relocate the module, or change this setting you will need to physically level the trailer and rerun the calibration process. To recalibrate your trailer check out the Manual Calibration Process.
Trailer Width (Side to Side)
Enter the wheel spacing from the center of the passenger tire to the drivers side tire. The units will be based on the units set in Settings | Units. The current unit settings are embedded in the field.
Trailer Length (Front to Back)
Enter the distance from the front most axle on a towable or fifth wheel to the tongue jack and/or pin.The units will be based on the units set in Settings | Units. The current unit settings are embedded in the field. For more details on making the measurements click here.
Units
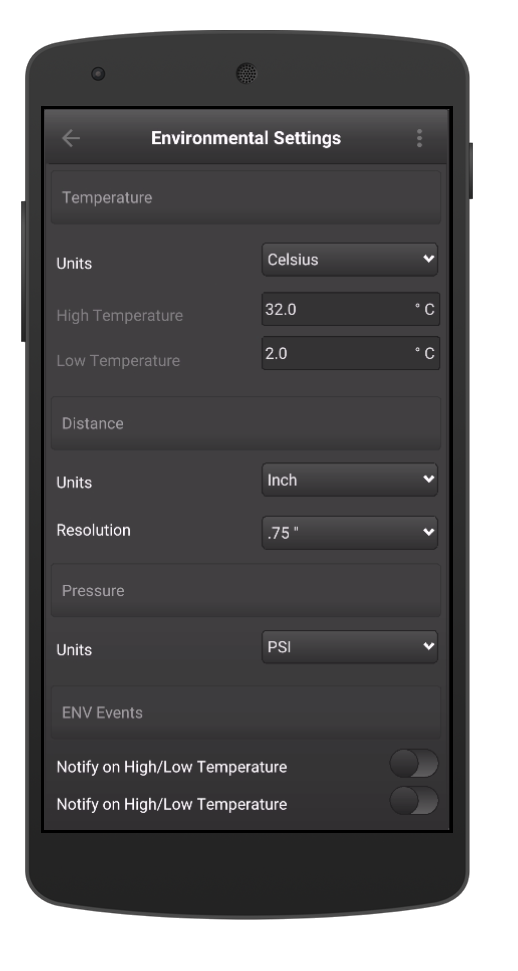
Temperature
oneView can display temperature in Celsius and Fahrenheit. Select your preferred temperature units from the drop down box. Note: Native units for temperature measurements in Level Up are degrees Celsius. If you choose Fahrenheit in the mobile application the degrees Celsius is converted using the formula below:
Distance Units
oneView allows you to set your preferred Distance units. oneView supports:
inches
mm
cm
Note
The oneView application Internally converts all measurements regardless of the distance unit type selected is always converted to mm. This can in some rare instances lead to some small rounding errors.
Resolution
The resolution setting is used to avoid the leveling screen from oscillating from red (not level) to green (level) whenever the Level Up module detects a small change (i.e. someone waking through the trailer). The resolution setting is the minimum amount of change the trailer needs to move either side to side or front to back before the level screen updates.
When the distance units is set to inches the resolution options are :
0.25”
0.50”
0.75” (recommended)
1.00”
When the distance units are set to mm the resolution options are :
05.0 mm
10.0 mm
20.0 mm (recommended)
25.0 mm
When the distance units are set to cm the resolution options are :
0.5 cm
1.0 cm
2.0 cm (recommended)
2.5 cm
Note
As Level Up stores all distance measurements in mm, the resolution may not be exact for all unit types. For example if you set the units to inches and choose 1.00” as the resolution, the oneView actually converts the 1.00” and stores it as 25 mm not 25.4 mm. The table below shows the measurement resolution “error”:
Max Unit Errors Between Metric and Imperial
Resolution Settings (inches) |
Converted from inches to mm |
Actual Resolution Used (mm) |
Error (mm) |
|---|---|---|---|
0.25 |
6.36 |
5 |
+1.35 |
0.50 |
12.7 |
10 |
+2.70 |
0.75 |
19.05 |
20 |
-0.95 |
1.00 |
25.4 |
25 |
+0.40 |
It is important to note that the error is not compounded as a function of length or width of the trailer. The resolution setting is only used as hysteresis to prevent the Level State screen from oscillating between level (green) and not level (red) when for example someone is walking through the trailer.
Real Time Clock
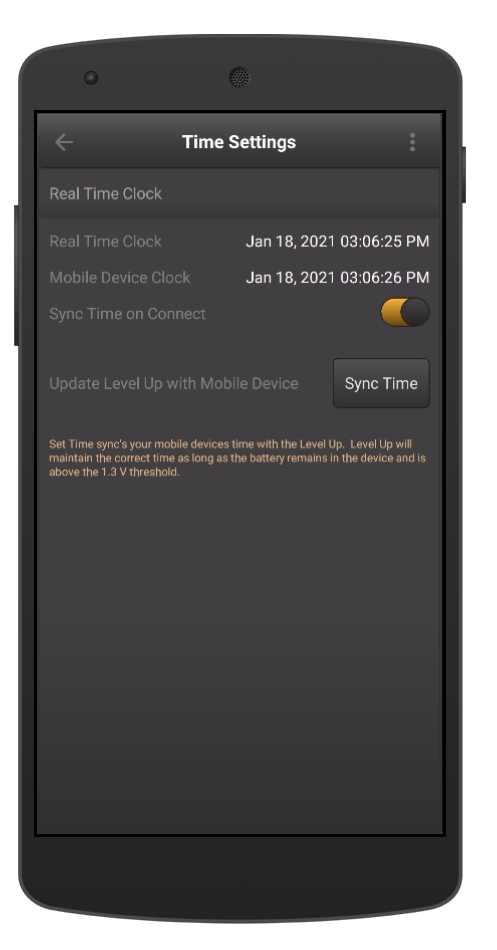
The Level Up Pro has a real time clock installed that is battery backed up and can maintain the current date and time even if there is insufficient battery life left to fully power up the Level Up module.
To set the real time clock simply go to Settings | Real Time Clock. The oneView application will display the current date and time of the Level Up module as well as the current date and time of your mobile device.
To set the time on the Level Up module simply press the Sync Time button. Sync’ing your mobile devices date and time to the Level Up module will only take a few seconds. Once the time is set you will notice that the Real Time Clock field and the Mobile Device Clock will match.
If you wish to automatically set the real time clock slide the Sync Time on Connect switch. This will automatically update the Level Up module with the correct date and time every time the Level Up application is launched.